Advanced Text Selection in Okular
Okular is a very nice document viewer with many nice features. The main difference between Okular and other document viewers is that Okular is a universal document viewer which supports a lot of document formats like pdf, djuv, chm, epub, odt etc. where other document viewers support only one type of format. For example, Adobe and Foxit Reader supports pdf, WinDjview supports djvu and so on. Okular has a lot of features for document viewing and editing. For a detailed information about Okular, readers are referred here.
But, there is a feature that is in all the famous document readers like Adobe PDF Reader, Foxit Reader etc. that is text selection and copy. Though, Okular has this feature already it is pretty immature compared to its counterparts.
Current Selection System:
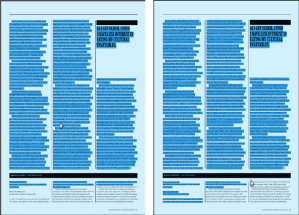
The current text selection(the release of July 27, 2011) gives very basic text selection feature. To use this feature user needs to open Okular and select Tools->Text Selection. The text selection is done by basic building blocks and then by line. For example, for pdf files the basic building blocks are characters. So, the user can select by characters. But, if the selection goes from one line to another it can be seen that the previous line is totally selected whether there is a column spacing in between the line or not. That means, Okular does not support multi-column text selection. So, if we have only one columned text, then this can be correctly selected by Okular right now. The text highlighting in case of annotation also suffers from the same problem. This problem can be visualized from the following figure:
There is also another problem regarding text selection. Before describing the problem, the reader need to know a little bit about the text generation system of Okular. Before running the text selection Okular need the texts to be generated from a generator. The generator class is a type of interface which need to be extended by every document generators. For example, Okular uses poppler for generating text from pdf document. The PDFgenerator class inherits the Generator class and use poppler to generate the texts. The generated texts are then stored in TextPage. For every page, there will be a TextPage. When text selection is done, the texts are extracted from the TextPage. There is a different generator for every document format.
Now we come to the second problem. Some generators do not consider spaces in between words(i.e. djvu). In this case, if we make a text selection, copy the text and paste it somewhere, as it has no spacing between words it will be nearly unreadable. The selection will not select the spaces in between words also and will be visually bad also. The following figure shows this problem:
Development Plan:
The initial plan was done in time of making the GSOC proposal. The plan was to study ocropus, the open source document layout and OCR system in detail and implement the techniques used there to support document layout analysis for text selection. It was necessary to study three algorithms: recursive XY cut, Voronoi segmentation and RAST Layout Analysis and develop an algorithm of our own taking those algorithms strengths. There was also a part of the plan that if there is time some work on statistical layout analysis might be done. The detailed initial plan can be found here.
The algorithms planned previously were used by ocropus on document image (image format like jpg, png). But, all our documents are digitally born document(pdf, djvu etc) where these algorithms cannot be used directly. As a result, not all algorithms I planned to work on was possible to implement in our case. Finally, I used a modified version of the famous recursive XY cut algorithm where statistical calculation is used for parameter selection based on global and local information.
The goal of this GSOC project was to implement the text selection so that it works with multi-column documents. The main target was technical journal and conference papers. Some issues were considered to keep the maximum possible flexibility. These are:
- The implementation should not be document or generator specific. As Okular supports different document formats, each of them needs to work with it. As Okular uses different generators for different file formats , the implementation was targeted to reside in the TextPage, not in the generators.
- The generators can return text of a document page as character(pdf), word(djvu), part of a word(odt) etc. How the selection will be done depends on the text generated by the document because the processing is done taking those as basic blocks. If some generator returns character, word or part of a word the selection procedure should work fine.
- The new implementation should not affect previous features anyway.
Implementation Details:
It can be assumed that the generator has already generated the texts and stored those in the corresponding textpage from where the text can be extracted easily. Taking the assumption true, the works is divided in two phase.
Phase 01:
The generator gives the texts of a page in some order. If the order were always true, there was no necessity to use Phase 01, Phase 02 alone was sufficient. So, as you can assume, this steps takes the texts from the textpage and make the ordering of the basic blocks correct whether or not they were previously. The job is done in seven steps. This is implemented in TextPage::correctTextOrder(). The steps are describe below:
Step 1: Removing the Spaces
Remove the spaces from the texts got from generator if there is any. If there is no space in the text(i.e djvu generator) nothing will be removed. The output of this step will be all texts without any space. This is a preprocessing which make texts from any generator(whether they give space or not) look somewhat alike.
Step 2: Construct word from characters
Here we create words from the basic blocks returned by the generator. Every basic block has a bounding rectangle. So, we merge some blocks until there is some space between their bounding rectangles. When we get a space, we can say that we have got a word. However, we store some additional information for future use. We map the basic blocks from which the word has been created. So, provided that we have the word, we can get the basic building blocks also. This information will be used in Step 7 to destruct basic blocks from words. Now, our basic block of calculation is a word. So, the computation significantly reduces.
Step 3: Create line from words
In this step, we will construct lines from words. We will first sort the words by their y coordinate. Then depending on the y-axis overlapping between the words we group them in a line. Finally, in every line, we sort the words by their x coordinate. The words in each line and the overall bounding rectangle of the line is stored.
Step 4: Generate statistical information
Now, we will generate some statistical information like word, column and line spacing. In step 3, we created lines where we stored words in each line and the bounding rectangle of the line. We can say that, words in every line is separated by horizontal spacings. So, we store all the spacings within those lines. From these spaces, we can find character spacing, word spacing, column spacing etc. We can also find line spacing by the vertical distance between two lines.
Step 5: Modified Recursive XY Cut Algorithm
Here, we implement the recursive XY Cut algorithm for page segmentation. As the normal version cannot be applied in our case directly, we use a modified version of the algorithm to determine the page layout of the page and segment the whole page in some regions. This algorithm requires the setup of two parameters which are initially setup from the value of word and line spacing got in step 4. This parameter setting is first done globally on the whole page, which is the first region. At every iteration, if it is possible to segment a region we segment it into two new regions and for every new region we will update the parameter values using the statistical information of that local region. Depending on the parameter selection, we continue to segment the page into regions until no new region can be created. All the regions are stored in a binary tree. Then, we traverse the tree in order and extract texts from all of these regions and merge them in order to make the complete texts in sorted order.
Step 6: Add Necessary Spaces
In this step, we will add spaces in between words. We will first make lines as we did in Step 3. Then for every two words we put a basic block of space in between them whose length is the difference between the words. Then, we combine all the space separated words from each region(as they are ordered by XY tree) and create the space separated word list.
Step 7: Extract characters from words
Finally, the words are destructed into characters or basic text blocks. This is now easy as we have stored the hash mapping between words and basic blocks in step 2. We remove every word from the word list and in its place put all the basic blocks that are used to make the word.
Phase 02:
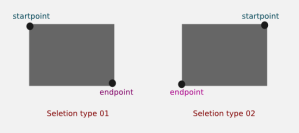
Now we have all the texts in correct order. We have to make the selection depending on the user input. The user starts selection in a point and ends in another point which can be called startpoint and endpoint respectively. All the basic blocks of texts in the page are stored in a TinyTextEntity class. The TinyTextEntity class has two members: the text content as string and the bounding rectangle of the string in the page. There are two types of selection possible which are show in the following figure:
If the startpoint and endpoint in the selections are altered, we will make them look like what is in the figure. Now, it can be taken that there is just two types of selection available for the user.
The current selection systems traverses all TinyTextEntity tmp and selects those tmp which satisfies the following two condition:
- The top of tmp is under startpoint or the bottom of tmp is under startpoint but the right of tmp is right to startpoint.
- The bottom of tmp is above startpoint or the top of tmp is above endpoint but the left of tmp is left to endpoint.
Though this selection system works fine with one columned texts, if there are multi-column it will not work. The following Figures shows the basic text selection system currently used by Okular (The red texts are the texts selected):
The selection system proposed here is not so trivial as the current system. We first make the selection to see like type01 or type02 so that it can be assumed that we have just two types of selections. We also decide which type of selection has been made. Then there a lot of cases to consider, which is describe below one by one:
1. Both the startpoint and endpoint are at empty spaces and outside of the content bounding rectangle of the page. The content bounding rectangle is the bounding rectangle outside which there is only empty space. There can be two case here:
a. If both points are in some spaces, where the rectangle formed by these points do not contain any texts. In this case we end here and do not select any texts. The current selection selects texts in this case also.
b. The bounding rectangle formed by start and endpoints have texts inside them. In this case, we try to set the start and endpoints to the nearest point in bounding rectangle.
2. In this step, we try to find out which TinyTextEntity are our starting and ending TinyTextEntity. We search for every TinyTextEntity for that page texts and find out which TinyTextEntity contains startpoint and which contains endpoint. We have also different cases here:
a. We found two TinyTextEntity. Of them, the first one contains starpoint and second one endpoint. So, we select all TinyTextEntity from the one that contains startpoint to that contains endpoint.
b. Check if the rectangle formed by startpoint and endpoint contains any TinyTextEntity. If none is found, we have nothing to select and can end here. The difference of this with 1.a is in this case startpoint and endpoint are within content bounding rectangle.
3. If 2.a or 2.b do not work, we come in this step. It can be that we do not found TextEntity which contains startpoint or which contains endpoint or both. But, the fact is that rectangle formed by start and endpoint does contain text. So, our target is a find the nearest and likely TinyTextEntity for startpoint and endpoint so that we can make our text selection work. The two cases here will find start and end point respectively:
a. We search the nearest rectangle consisting of some TinyTextEntity right to or bottom of the startPoint for selection 01 and for selection 02, we have to search for right and top. So, we get our suitable TinyTextEntity from where we will start.
b. For endpoint, we have to find the point top of or left to endpoint if we have selection 01. Otherwise, the search will be left and bottom.
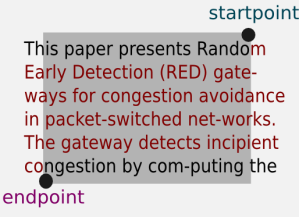
After the end of Step 3, we have two TinyTextEntity in our hand. So, we select all TinyTextEntity from the one that contains startpoint to that contains endpoint. The sample outputs for both of the selection cases are show below(red characters shows start and end TinyTextEntity):
Comparison with current Output:
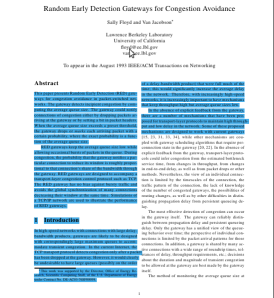
After the algorithm is run, our previous pdf text selection works like below:
We can see now that the new selection method preserves column spacing and detect column in texts.
There was another problem we showed previously with djvu file formats where in generator output text no space is given. But, if we see the following figure the text selection is just like we did in pdf. That means, we have got spaces in between words this time which was present previously. This is due to the courtesy of step 6.
With the solution implemented, we can recognize and select multi-column texts. The following figure shows a four column document example to compare previous and current outputs:
Additional Additions:
During implementing text selection, some additional problems have been found. Some of them has been solved.
- Copy Text: Even if nothing is selected after text selection is activated, if we right click we can see a Copy Text Dialog which essentially copies whatever is in the system’s copy buffer. In our implementation, we changed this to work only if something is selected. So, if somebody right clicks without selecting anything, he will not get any Copy Text option.
- Selection Problem with odt,epub: When we make text selection on odt or epub documents, the selection color gets black instead of the nice blue default selection color. This problem occurs because in case of odt or epub files the image we get is actually transparent. In our code, we changed to make the selection color blue.
Scope of Improvements:
Though the selection mechanism implemented here works pretty fine with technical journals and conference papers, they do not work fine with some of the complex and fancy layout used by newspapers and magazines. There are also some issues that can be improved. The issues are described as following:
1. The first one is about the text generated by the generator. Sometimes in the case of mathematical texts djvu returns text in a random manner which makes a problem in selection. The most problematic case is the chm files. The generator always gives text in random manner, sometimes by words, sometimes by several lines which is totally undefined. To remove this problem, we have to use a better generator, the changes need to be in the text generation phase.
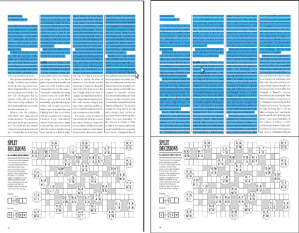
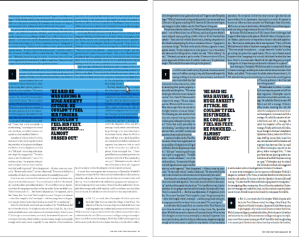
2. We have not considered much complex layouts like column overlaying and column overlapping. This kind of layouts are often seen in newspapers and magazines. An example of column overlaying is given in the next figure:
Some recent work has been done on supporting column overlaying and overlapping in the XY Cut algorithm. If we can implement these algorithms, we can make text selection work for magazines and newspapers also.
3. The additional feature implemented in epub has still some problem. One is, the selected text gets bold when we make selection. There are also some previous problem where if we make a selection or annotation(that use buffering) and then scroll the page up and down, some random colored lines are created from nowhere. That seems to be a issue related with using back buffering.
So, I think the goal of this summer of code project has been fulfilled. Though there are still scope of improvements, I would like to implement those features myself in future aside of my academic studies. My mentor Albert Astals Cid helped me always when I faced with some problems or needed suggestion. Finally, I hope this project will benefit all Okular users and will establish Okular as a more powerful document viewer.






amazing work
Thank you 🙂
Why is you blog not on Planet KDE?
Actually, my mentor has already posted the link of my blog in planetkde. So, I guess I don’t need to do it again. But, may be from the next time I will blog on planetkde.
> To use this feature user needs to open Okular and select Tools->Text Selection.
I’ve always selected text by using the right mouse button. If you drag a box with the right mouse button, you get the option of selecting text or selecting an image. Also, it’s less cumbersome and involves no menu-hunting. 🙂
But, tell me honestly, can you select from a two column document by one and half of a column with this selection mechanism ?
In principle the djvu format contains a segmentation of the text in columns, paragraphs, lines, words, and characters. So the spaces are implicitly specified by the word segmentation. Maybe the generator should expose this information. See “hidden text syntax” in http://djvu.sourceforge.net/doc/man/djvused.html.
Thank you for the information. This might help us to change the generator of djvu a bit so that it generates spaces also.
This is really great news! I always had problems with the text selection. Looking forward to use it. When will it get released? Is there a opensuse RPM to try it out?
After the review of others, it may be merged with the recent work. Sorry, no RPM right now. But, I will let you know if there is any available.
Nice to see that core applications of KDE which we use every day, a getting polished! Thank you for your desire and quality work!
Thank you for your time to read the blog 🙂
I think that, after your work, text selection deserves to get a dedicated button in the UI by default, rather than the finicky dual-purpose image/text selection button that is there now.
It is possible to click on the dual purpose image/text selection button and get the text selection button. It do not always work as it should though. If it can be worked always, I think there is no necessity to add another dedicated button.
Also, we may save user preferences whether they want textselection or normal selection as default option.
Awesome work ..!!
🙂
Really awesome. 🙂
Thanks 🙂
It looks absolutely excellent. I mostly read 2-column articles and it is a most welcome improvement. Congratulations!
Thank you. I would like to add some more advanced text selection later
Wow! Really impressive work. The too simplistic selection mechanism was one of the things that annoyed me a bit when using Okular (which I do very day, for hours, as I use it heavily for my work). I was extremely happy to see that you were chosen as a GSOC student with this project and I am even happier that this worked out so well. 🙂 Congratulations and a big that you to you. I hope you will stay with Okular and KDE, as you write yourself.
Cheers, mutlu
Thank you very much for your comments. Yeah, I also hope to make a lot of contributions to okular and KDE in future.
Wee haa!
Thanks!
[…] Si queréis saber más no os perdáis la entrada de Mahfuzur Rahman Mamun en su blog,nightcrawler in shadow, donde explica con detalle el proyecto. Más información: TSDEO’s Blog | […]
Mejoras en Okular: selección de texto en multicolumnas : KDE Blog said this on August 29, 2011 at 12:58 PM |
This is great stuff.
Does it support CJK languages without spaces?
I have tried copying from an Okular pdf but there seem to be no carriage returns in the middle of sentences which makes removal difficult.
[…] программе для просмотра документов Okular добавлены расширенные средства для выделения областей текста, например, текст […]
Новости компьютерного мира - Релиз KDE SC 4.8 said this on January 26, 2012 at 7:50 AM |
[…] fitur-fitur baru seperti plugin Search & replace dan penampil dokumen Okular sekarang memiliki fitur pemilihan teks lanjutan. Marble virtual globe telah diperbaiki dengan integrasi KRunner dan kemampuan untuk melihat profil […]
KDE SC 4.8 Hadir Dengan Manajemen Power Yang Lebih Baik | LinuxBox.Web.ID said this on January 29, 2012 at 7:31 PM |
[…] A fade effect is applied in image transitions. Okular 4.8, KDE’s document viewer brings advanced text selection features. KMail has seen many performance and stability […]
KDE Applications 4.8 Offer Faster, More Scalable File Management | LinuxReporter said this on March 3, 2012 at 9:31 PM |
[…] 文档查看器 Okular 的文本选择进行了扩展,现在您可以复制 PDF […]
openSUSE 星球 said this on September 5, 2012 at 6:21 AM |
Thanks a lot…
[…] 12.2 的 KDE PIM 已能应对大部分用户面临的情况了。 KDE 文档查看器 Okular 的文本选择进行了扩展,现在您可以复制 PDF […]
先睹为快:openSUSE 12.2 和 KDE said this on September 5, 2012 at 5:20 PM |
[…] document viewer Okular has seen extensive work on text selection so you can copy text from PDFs. Instead of dumbly selecting all characters below the square […]
Sneak Peek: openSUSE 12.2 and KDE | 321Linux.com said this on September 11, 2012 at 2:40 AM |
can i get the code for recursive xy cut algorithm plzzzzzzzzz
The algorithm is used in the okular code which is under open source license. Also, you can figure it out from the code as the algorithm is quite simple.
Excellent way of describing, and nice post to get information regarding my presentation subject matter,
which i am going to present in college.
Thank You and let me know about your presentation if possible. Maybe I can also get some information.
Awesome information I get in this website,keep up the good job.Thanks!